4.2 GPU Programming model
From a programming perspective, the similarity between shared memory multicore computing and GPU computing is that threads execute on cores. When using NVIDIA’s CUDA (Compute Unified Device Architecture) for developing code for the GPU, the programming model and way of thinking about the computation differs, however. For computations involving 1D, 2D, or 3D arrays of data, the CUDA programming model is designed for programmers to set up the following:
grids containing blocks of threads, in one, two, or three dimensions each,and
assign threads so that each thread is working on one data element in the array.
Note
Note this very important point: when doing this coding, you need to think in terms of setting up one thread per data element to be computed in your array. Let’s see how we do this.
The dim3 data structure and the CUDA programming model
The key new idea in CUDA programming is that the programmer is responsible for:
setting up the grid of blocks of threads and
determining a mapping of those threads to elements in 1D, 2D, or 3D arrays.
We will start with some code illustrating the first task, then look at the second task later.
Given the design of the GPU device shown in Figure 4-2, the CUDA programming model is as follows and depicted in Figure 4-3:
Each thread maps to one core.
A block of threads maps to one SM.
A grid of thread blocks maps to multiple SMs, one block per SM.
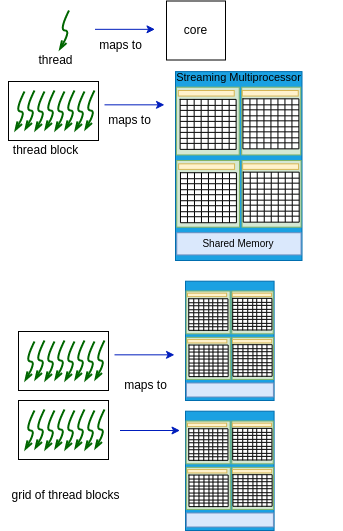
Figure 4-3. The CUDA Programming Model
The CUDA design is to enable three dimensions for both blocks and grids, to make it easier to set up thread mapping to data elements in 1D, 2D, or 3D arrays. This does add complexity, but once you get the hang of it, setting up the mapping isn’t too difficult. However it can sometimes be prone to errors, so you have to check your code carefully.
The CUDA library and compiler have a special built-in data structure called dim3 that programmers can use to declare the dimensions of the grid containing block(s) of threads. As its name implies, it is used to set up 3 dimensions: x, y, and z. Let’s look at our first simple example of this.
Filename: 1-basics/1.2-dim3/dim3Demo.cu
1 2 3 4 5 6 7 8 9 10 11 12 13 14 15 16 17 18 19 20 21 22 23 | int main(int argc, char **argv) {
// dim3 is a special data type: a vector of 3 integers.
// each integer is accessed using .x, .y and .z
// (see printDims() above)
// 1 dimensionsional case is the following: 1D grid of 1D block
dim3 gridDim(1); // 1 blocks in x direction, y, z default to 1
dim3 blockDim(8); // 8 threads per block in x direction
// TODO: Try 128 threads in a block. What do you observe?
// Try the maximum threads per block allowed for your card.
// See device_info example.
// Try over the maximum threads per block for your card.
printDims(gridDim, blockDim);
printf("From each thread:\n");
hello<<<gridDim, blockDim>>>();
cudaDeviceSynchronize(); // need for printfs in kernel to flush
return 0;
}
|
For this first example it is helpful to examine each line of this code and read the comments. Line 8 declares a variable called gridDim of type dim3. In this case, the x dimension is specified as 1, and the y and z dimensions automatically default to 1. This is designed to be used to have a grid with a single block of threads in it. Line 9 declares a second variable of type dim3, called blockDim, whose x dimension is 8,and its y and z dimensions have defaulted to 1. This is designed to create a block of 8 threads.
On line 16 of main above we call the printDims function, which looks like this:
void printDims(dim3 gridDim, dim3 blockDim) {
    printf("Grid Dimensions : [%d, %d, %d] blocks. \n",
    gridDim.x, gridDim.y, gridDim.z);

    printf("Block Dimensions : [%d, %d, %d] threads.\n",
    blockDim.x, blockDim.y, blockDim.z);
}
For this example, what will be printed is this:
Grid Dimensions : [1, 1, 1] blocks.
Block Dimensions : [8, 1, 1] threads.
Executing code on the GPU device
Line 19 of the main code above illustrates how we execute a function on the GPU device. In CUDA nomenclature, these are called device kernel functions.
Note
The defining feature of calling a kernel function from the host code in a CUDA program is the use of <<< after the name of the function, followed by the grid dimensions, a comma, and the block dimensions, then an ending >>> before the parameters to be sent to the function in the standard parentheses.
In this special format, we are indicating that the function called hello should be executed on as many threads as are defined by the total number of blocks in the grid. In this case, we see that it is one block of 8 threads in the grid.
The kernel function called hello is defined like this in this code example:
__global__ void hello() {
    // special dim3 variables available to each thread in a kernel
    // or device function:
    // blockIdx    the x, y, z coordinate of the block in the grid
    // threadIdX   the x, y, z coordinate of the thread in the block
    printf("I am thread (%d, %d, %d) of block (%d, %d, %d) in the grid\n",
           threadIdx.x, threadIdx.y, threadIdx.z,
           blockIdx.x, blockIdx.y, blockIdx.z );
}
Some important features to note here are that:
the CUDA compiler expects these functions designed to be run on the GPU to be prefaced with the keyword ‘__global__’ (two underscores before and after),
this signals that the code will be compiled into special code to run on the GPU,
these functions can return values to the host; this one does not and is declared void,
we can print from each thread within the device, but for these to be seen on the host the threads need to be synchronized after the kernel function call (see below).
The most important feature to note is that there are special CUDA variables available to the programmer inside the kernel function to determine the dimension of the thread within block:
threadIdx.x
threadIdx.y
threadIdx.z
and the dimension of the block within the grid:
blockIdx.x
blockIdx.y
blockIdx.z
So in main, when the following lines are executed:
hello<<<gridDim, blockDim>>>();
cudaDeviceSynchronize();
The hello function code is then run on every thread that was set up using gridDim and blockDim. In this case, gridDim has [1,1,1], so that there is one single block in the grid, and blockDim has [8,1,1] so that the block of threads is 1-dimensional in the x direction, containing 8 threads. The results of the printfs in the hello kernel function running separately on each thread are guaranteed to complete and return to the host after the cudaDeviceSynchronize function is called.
Note
This is an unrealistically simple example to illustrate the features of CUDA grids of blocks of threads in a grid. Typically we use many more, which you will try yourself.
The result of running the kernel function hello within the main program called dim3Demo looks like this:
Grid Dimensions : [1, 1, 1] blocks.
Block Dimensions : [8, 1, 1] threads.
From each thread:
I am thread (0, 0, 0) of block (0, 0, 0) in the grid
I am thread (1, 0, 0) of block (0, 0, 0) in the grid
I am thread (2, 0, 0) of block (0, 0, 0) in the grid
I am thread (3, 0, 0) of block (0, 0, 0) in the grid
I am thread (4, 0, 0) of block (0, 0, 0) in the grid
I am thread (5, 0, 0) of block (0, 0, 0) in the grid
I am thread (6, 0, 0) of block (0, 0, 0) in the grid
I am thread (7, 0, 0) of block (0, 0, 0) in the grid
The important points to note here are:
numbering of x, y, and z coordinates of the location of a block in a grid begins with zero, and
similarly, the numbering of x, y, z coordinates of a thread within a block starts with zero.
In visual terms, look at Figure 4-4 below. We have for simplicity defined a 1D grid containing a single block, and the pertinent values for each thread as it executes are blockIdx.x and threadIdx.x. The squiggly arrows are a convention used to indicate a thread running on a core in the device.
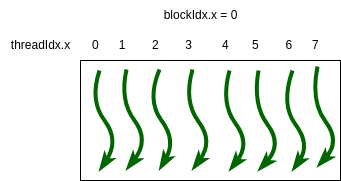
Figure 4-4. A simple 1D grid with one block of 8 threads.
Note
Though the prints above look like the threads might be running sequentially, they are running in parallel. In Figure 4-4, imagine time going downward from top to bottom- each green thread is executing code at the same time. This is how you want to perceive computations in the CUDA programming model.
Build and run
You can use the make command on your own machine or compile the code like this:
nvcc -arch=native -o dim3Demo dim3Demo.cu
Remember that you will need to use a different -arch flag if native does not work for you. (See note at end of section 4.1.)
You can execute this code like this:
./dim3Demo
Test the limits
When you have this code on your own machine with a GPU card and CUDA installed, try doing what is suggested in the TODO comment in the code: use more threads per block in the x direction (128).
Note that there is a maximum number of threads in each direction for any block, and it varies by GPU device. Note how many are allowed in the x direction for your card by running the device_info program from earlier again (you will change directories to do that). Then come back to this example and change the blockDim definition to use a number that is too large for your card.
Note
We usually include extra functions that test for errors when CUDA code is run on the device, because we programmers can make mistakes like the above if we are not paying attention to the limits of our device. We will see the use of a utility function for this in later examples.
Review questions
- True.
- Look carefully at the figure of the CUDA programming model.
- False.
- Yes! A block of threads maps to one SM.
4.2-1: The threads in a thread block are distributed across SM units so that each thread is executed by one SM unit.
- True.
- Note what we said earlier about designating functions that run on the GPU device that get invoked in the host code.
- False.
- Yes! This qualifier signifies a 'kernel' function that can only be invoked on the device from within the host code.
4.2-2: Functions annotated with the __global__ qualifier may be executed on the host or the device.