4.5 Vector Addition example with CUDA Unified Memory
NVIDIA GPUS are now capable of making it easier to manage the memory copying for us with a feature called unified memory. Recently, this is often referred to as CUDA managed data, to signify that the data in memory and its movement (if needed) is managed for the programmer.
Unified Memory works on any NVIDIA GPU with SM architecture, or compute capability, of 3.0 or higher. Recall when we first examined a device’s information, the first line of output from the device_info program gives us information like this:
with Compute 8.6 capability
Your GPU may be different, but as long as it is above 3.0, you should be able to run the code given here.
Note
If you have a smaller NVIDIA Jetson single-board computer, you should use unified memory, aka CUDA managed data, because the hardware is suited for this.
This method is now preferred
We provided the previous example with the original explicit data copying primarily because you will encounter many CUDA examples on the Web that still show this way of writing CUDA code. However, it is our experience that the device cards that you will encounter today have the capability of handling CUDA managed memory very well, and you should use it.
In the previous example, the description of the steps was as follows:
Allocate 2 arrays, x and y, on the host and initialize them with data.
Allocate 2 arrays d_x, and d_y, on the GPU device.
Copy each of the arrays from the host to the device.
Perform the addition on the device using a kernel function, keeping result in d_y.
Ensure that the device is finished with the computation.
Copy the resulting array d_y from the device to the host, back into array y.
Check that the computation ran correctly.
Free memory on the device and the host.
When using managed memory, the program steps are:
Allocate 2 arrays, x and y, as managed data arrays used on the host and the device. Initialize them with data.
Perform the addition on the device using a kernel function, keeping result in y.
Ensure that the device is finished with the computation.
Check that the computation ran correctly.
Free the unified data memory
Fewer steps and simpler code- what’s not to like?
The main program
The kernel function for vector addition and the helper functions are exactly the same as the previous example. It is helpful to just look at how the main() function has changed. Note the numbers of the steps in English given above are in comments in the code.
Filename: 3-UMVectorAdd/vectorAdd.cu
int main(int argc, char **argv)
{
  printf("Vector addition using managed memory.\n");
  // Set up size of arrays for vectors
  int N = 32*1048576;
  // TODO: try changng the size of the arrays by doubling or
  //       halving (32 becomes 64 or 16). Note how the grid size changes.
  printf("size (N) of 1D arrays are: %d\n\n", N);

  // host vectors, which are arrays of length N
  float *x, *y;

  // Size, in bytes, of each vector; just use below
  size_t bytes = N*sizeof(float);

  // 1.1 Allocate Unified Memory – accessible from CPU or GPU
  cudaMallocManaged(&x, bytes);
  cudaMallocManaged(&y, bytes);
  cudaCheckErrors("allocate managed memory");

  // 1.2 initialize x and y arrays on the host
  initialize(x, y, N);  // set values in each vector

  // Number of threads in each thread block
  int blockSize = 256;
  getArguments(argc, argv, &blockSize); //update blocksize from cmd line

  // Number of thread blocks in grid needs to be based on array size
  int gridSize = (int)ceil((float)N/blockSize);

  printf("add vectors on device using grid with ");
  printf("%d blocks of %d threads each.\n", gridSize, blockSize);
  // 2. Execute the kernel
  vecAdd<<<gridSize, blockSize>>>(x, y, N);
  cudaCheckErrors("vecAdd kernel call");

  // 3. Wait for GPU to finish before accessing on host
  cudaDeviceSynchronize();
  cudaCheckErrors("Failure to synchronize device");

  // 4. Check that the computation ran correctly
  verifyCorrect(y, N);

  printf("execution complete\n");

  // 5. free unified memory
  cudaFree(x);
  cudaFree(y);
  cudaCheckErrors("free unified memory");

  return 0;

}
For comparison, below are the two main programs side by side, with the previous version on the left and the preferred managed version on the right. Though you may not be able to read the text very well, from this you can see how using managed data simplifies the setup (top box on right vs. top two boxes on left) and teardown (bottom boxes on each side) of data movement and needs fewer lines of code.
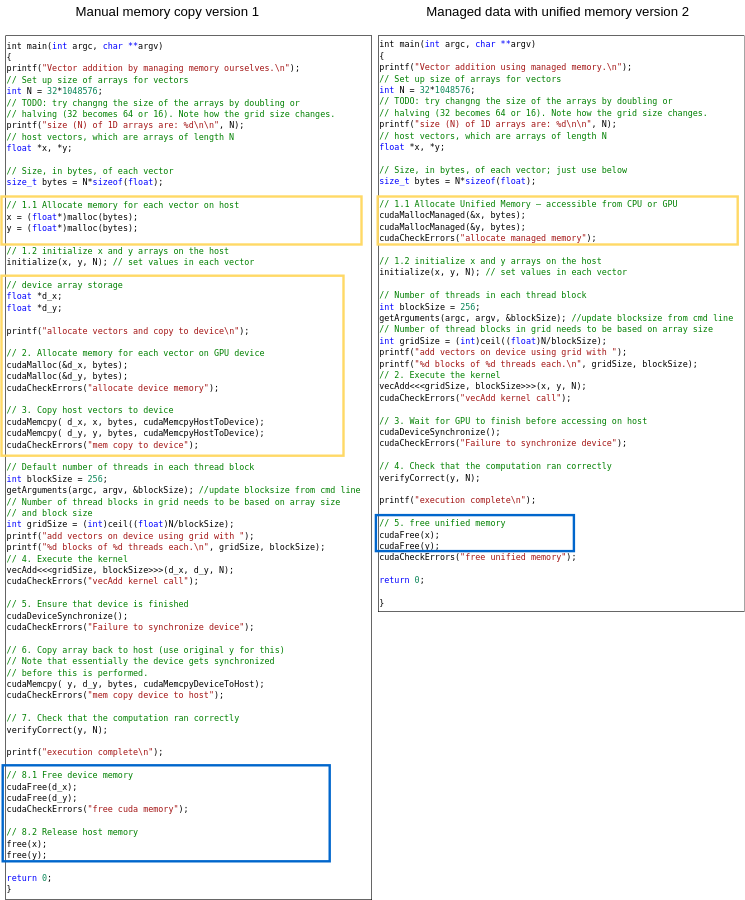
Note
The most important point about this example is that the data copying hasn’t changed from the previous manual example on the left above: it’s just being done for us.
Build and run
You can use the make command on your own machine or compile the code like this:
nvcc -arch=native -o vectorAdd vectorAdd.cu
Remember that you will need to use a different -arch flag if native does not work for you. (See note at end of section 4.1.)
You can execute this code like this:
./vectorAdd
The result should be the same as the previous example.
Vector addition using managed memory.
size (N) of 1D arrays are: 33554432

add vectors on device using grid with 131072 blocks of 256 threads each.
Max error: 0
execution complete
Note the default block size (threads per block) used in the code. You can try increasing it or decreasing it by adding the block size as an argument, like this:
./vectorAdd 128
What you know now is that this can be changed and the code still runs correctly. In the next section we will introduce how to time our code so that we can determine if changes like this have any effect on the code’s performance.
An Exercise
For practice writing a kernel function, you could try computing something different using each element of the arrays. For example, multiply each element in x by a constant and add another constant, placing the new computed value into array y at that element. Or you could get more sophisticated by using other math library functions, such as sqrt. Remember that you will need to verify whether the result is correct by updating the function that does this.